Showing posts with label InColor07. Show all posts

Monday, May 31, 2010

Another Scrapbook Page


I love this color combo I came up with for this page. It is two completely different years InColors. One is coming back and another one is leaving us. Don't Wild Wasabi and Bermuda Bay look good together. The best part of this page is that I was able to use the paper from the Designer Series Packs! How great is that! Loving this layout, it might just be used again just so I can use up some of those paper packs I earned for free!

Also I got to use the Double Punch, Extra Large Cogs. Yes, this is a double punch. The punch actually punches twice!!! Once for the circle and another time for the spokes. How cool is that!

Stay Tuned.... only one more day until the retired stamp set list for the 09-10 Idea Book and Catalog comes out. I promise to get it posted and emailed as soon as I can!
Ingredients to make the scrapbook page:
Stamp Sets: In a Word
Ink: Wild Wasabi
Paper: Welcome Neighbor Designer Series Paper (retired), Wild Wasabi Patterns Designer Series Paper, Wild Wasabi, Bermuda Bay, Whisper White
Accessories: 5/8" White Jumbo Brads, Bermuda Bay Polka Dot Grosgrain Ribbon, On Board Long Board
Tools: Extra Large Cogs Double Punch, Large Oval Punch, Border Punch from a local craft store, Big Shot, Simple Letters Sizzex

Monday, March 9, 2009

Inkredible Challenge

This week's challenge was to open up the Stampin' Up! catalog and flip through the catalog and stop on a random page. Pick a project from that page. Now, you need to make the same project but different. What does this mean, you ask?... You can use the sketch with different stamps and colors. or just swap out the colors, but make the project the same as shown. You can also just use the same colors or stamps on your chosen project. So I my project is the scrap page on page 124. (see below for the picture out of the catalog.) The page in the book was an 8x8 but I decided to make an 8 1/2 x11 which left me a little more room for embellishments so it looks slightly different.

So here is my scrapbook page of my nephew on his 1st birthday. I just love this picture of him. I pulled out the retired Creative License scrappin' kit and the Take Note rub-ons. The limited edition and the white cirlce on the bottom come from the rubons. The rest of the paper and the self-adhseive die cuts come from the kit. The only other thing I used was the Wild Wasabi prints designer series paper to make the pocket. I folded over the paper from all three sides to make the pocket and then used my 1" punch to make the opening. The insert, I punched a round tab punch and put a 5/18" silver brad in the center. I also punched two stars with my large and small star punches to put on the page. I also made the one with my On Board Timeless Type chipboard. I sponged on some Blue Bayou ink.

Wednesday, December 3, 2008

Scrapping for my Dad

I was downstairs scrapping the other day. While I was scapping, my dad was looking through a pile of my photos and decided he wanted to take two of the photos. I said sure, but let me do something with them first. I wanted to find a way that he could hold onto them so they don't get scratched up and when he showed them off. So I decided to do a 6x6 pages and put them in the page protector for him to travel with. He really liked this photo with him, my brother and nephew when he was being born. It's 3 generation of Sloma men. The only one missing is my grandfather. Maybe during the holidays we can capture the picture for my dad. As for the scrap page, I used many retired products, Afternoon tea designer series paper, twill chocolate chip ribbon, pewter hodgepodge hardware, even the Soft Sky card stock. The only things not retired were the circluar frame from the Together Forever stamp set with the Lovely Letters S stamped in the center and pewter brads on the bottom of the page.


Tuesday, October 7, 2008

Birthday Greeting from the Mickey Mouse Clubhouse


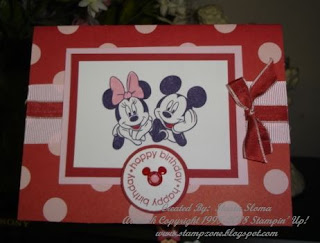
I have to say I love this stamp set from EK Success. It has all these Mickey characters and phrases. This is going to come in handy when I start scrapbooking. I am big Mickey Mouse fan. Here is a card that I made for my niece. The outside is simple enough. It starts with big Polka Dots from the Bella Rose Designer Series Paper. I stamped the image of Mickey and Minnie and colored it in with my Stampin' Write Markers. I then took the greeting from the Think Happy Thoughts stamp set, punched and layered it on top of another circle. In the center I put a Mickey Mouse eyelet that I got from Disney World a few years back and put a pretty in pink brad in the center. The finishing touch was the wide Pink Pirouette Ribbon laid down in the center card followed by the Red Riding Hood Taffeta ribbon and Red Riding Hood bow attached to the side with a mini glue dot.
The inside of the card is where the fun begins. I took the 1 3/4" circle punch and punched circle out of the black card stock. I then cut the circle and starting cutting it around to make a spiral. Click here to see a great tutorial on Splitcoast Stampers. I have to say here spiral looks a lot neater than mine. I then stamped Mickey and friends and colored them in with my markers and cut them out. I then attached each of them to the spiral with mini glue dots. Lastly, I punched stars out and put a black brad though the center. Then I took a big star and punched it out and stamped the let's celebrate from the On your birthday. Then I wrote the greeting in my uni-signal white gel pen. It says Happy Birthday Julie from all your friends at the Mickey Mouse clubhouse. I am going to mail this card so she will have a fun surprise in the mail. Of course, I showed it to my mom and she tells me I should put some little presents in the package like stickers or a lollipop. So I guess I will be going to the Disney store after work to see if I track down some little gifts to put in the mail with her birthday card from Mickey.

Tuesday, August 12, 2008

Amazing Scrapbook Pages

Well I apologize for the couple days of no posts. I needed the weekend to recooperate after 4 days at convention and then playing catch up at home, work and my Stampin' Up! business and all the annoucements last week. I swear I got home on Friday after work and all I did was relax and unwind. Here are some amazing scrapbook pages that I saw on the display boards at convention. Again, I apologize since they are posted on the display boards there is no way of knowing who created what. Hope this inspires all of you to take out those pictures and start scrappin'. I know I can't wait to get started. I just preordered my big shot this afternoon. I can't wait to use my die-cut alphabet!

Here are the scrapbook pages. Hope 17 scrapbook page layouts makes up for not posting for a couple of days. :)


Monday, August 4, 2008

Project on Stamper's Showcase


There is always something happening with Stampin' Up! This morning I woke up to another card on Stamper's Showcase. What a way to start my day! Here are all the project supplies to make the card.

Stamps:
ONE OF A KIND STAMP SET
ENJOY EVERY MOMENT STAMP SET
Paper:
CARD STOCK WHISPER WHITE 8 1/2X11
CARD STOCK PURELY POMEGRANATE 8 1/2X11 CARD STOCK GROOVY GUAVA 8 1/2X11
Inks:
CLASSIC STAMPIN PAD PURELY POMEGRANATE
CLASSIC STAMPIN PAD GROOVY GUAVA
Accessories:
BRADS SILVER
RIBBON DOUBLE-STITCHED GROOVY GUAVA
PUNCH BOHO BLOSSOMS
STAMPIN' DIMENSIONALS
SNAIL ADHESIVE PERMANENT

Saturday, July 19, 2008

Angels Everywhere


I started day with a wonderful surprise that just made my day. I came into work with a box on my chair. I opened it up to find these two beautiful items that were crocheted by my friend's mother. I had recently done something for the two of them and this was there way of thanking me, well I have to say I was in tears this morning. This weekend is my nephew's christening and I am the godmother. Usually I am so good about getting a special something for the event, but this time with everything going on my life, it slipped my mind. I, of course made two cards for the event, but I completely forgot about getting something special keepsake, so when I saw the homemade cross and and a bib, I was really touched. It was like an angel was watching out for me and giving me what I needed. Her work is just beautiful.

Here are the two cards I made for my nephew. I have to say it is a challenge making homemade christening cards with no actual religious sets from Stampin' Up! That is my ultimate wish list is to have one or two sets that we can use for occasions like these. So the first one started with a cross punch that I think I picked up at AC Moore made by EK Success. I put a halfback pearl in the center and layered on top of two square punches. Next came the border that I made with my new scallop edge punch. Have I said how much I love this punch lately. Next, I lined up the All Scallops stamp set stamping in our new InColor, Baja Breeze. Then a strip of the Baja Breeze card stock came next. The finishing touch was the greeting stamped from our retired Buggies & Booties stamp set.

The next card, I decided to use the photo that was on the Christening invitation. I cut the photo and then used my corner rounder to round out the corners. Next I stamped the greeting from the retired Welcome Little One stamp set masking off part of the greeting. I adhered them to a piece of textured Soft Sky paper and then a strip of the Prints Soft Sky Designer Series Paper followed. Lastly, some white tafetta ribbon and half back pearls finish the card off.

Tuesday, July 15, 2008

Two Cards on Stamper's Showcase This Morning!

Wow! I am in shock. I am besides myself. I can't believe I have two cards on Stamper's Showcase this morning! Here they are both featuring the Garden Whimsy stamp set. I think this makes it 4 cards that I have made with Garden Whimsy that have been a hit and have shown up on Stamper's Showcase or been published. This must be my lucky set! Thank you for sharing in my excitement.

Stamps:
GARDEN WHIMSY STAMP SET
SINCERE SALUTATIONS STAMP SET
POLKA DOT STAMP SET

Paper:
CARD STOCK WHISPER WHITE 8 1/2X11
CARD STOCK PRETTY IN PINK 8 1/2X11
CARD STOCK WILD WASABI 8 1/2 X 11

Inks:
STAMPIN WRITE MARKER PRETTY IN PINK
CLASSIC STAMPIN PAD PRETTY IN PINK
CLASSIC STAMPIN PAD WILD WASABI
STAMPIN WRITE MARKER REGAL ROSE
CLASSIC STAMPIN PAD REGAL ROSE
Stamps:
GARDEN WHIMSY STAMP SET
THINK HAPPY THOUGHTS STAMP SET

Paper:
DESIGNER SERIES PAPER PRINTS CERTAINLY CELERY 12 X 12 DBL SI
CARD STOCK CERTAINLY CELERY 8 1/2X11
CARD STOCK BARELY BANANA 8 1/2X11
CARD STOCK WHISPER WHITE 8 1/2X11

Inks:
STAMPIN WRITE MARKER CERTAINLY CELERY
CLASSIC STAMPIN PAD CERTAINLY CELERY
STAMPIN WRITE MARKER BARELY BANANA
CLASSIC STAMPIN PAD BARELY BANANA

Accessories:
BRADS SILVER
STAMPIN DIMENSIONALS
PUNCH 1 3/8 INCH CIRCLE
PUNCH 1 1/4 INCH CIRCLE
PUNCH SCALLOP CIRCLE
PUNCH TRIO FLOWER
SNAIL ADHESIVE PERMANENT

Friday, July 4, 2008

Different Twists

Just to show one idea can spin off to another card idea. I decided to post two of my cards that I created that just that.

The first one is based on my card that was on Stamper's Showcase. Click here to see the other card. The only thing that I did differently was attaching pieces of ribbon to the side of the card, wide chocolate chip grosgrain and blue bayou double stiched ribbon.


The second card was one I made for my mom's birthday. Click here to see that card. The only difference between this card and the one I made was a less flowers and embellishments and thinner ribbons. Happy 4th of July!

Thursday, July 3, 2008

Birthday Card for the Men in Your Life


Well I have to say, it's always a challenge, when I have to make a birthday card for any men. In this case, I decided to use our Wild Wasabi Prints Designer Series Paper to help me out. Here I took two of the papers and did some color blocking with them. I stamped the greeting from the Celebrate Everything stamp set onto Sahara Sand card stock. The second word saying comes from the Full of Life stamp set that was just in the last Occasions mini. I punched out the stars with my large and small star punches and put vintage brads through the center. The finishing touch was the double stiched Wild Wasaibi ribbon attached in the center of the card.

Sunday, June 22, 2008

On Stamper's Showcase This Morning!


I am so excited that one of my cards is on Stamper's Showcase this morning! I have to say this became one of my favorite color combinations when we did a few months, so I submitted for a contest. Here is the card made with Chocolate Chip, River Rock and Blue Bayou. Perfect for the men in your life.

Stamps:
FULL OF LIFE STAMP SET
CELEBRATE EVERYTHING STAMP SET
POLKA DOT STAMP SET

Paper:
CARD STOCK BLUE BAYOU 8 1/2 X 11
CARD STOCK VERY VANILLA 8 1/2X11
CARD STOCK TEXTURED IN COLOR 12 X 12
CARD STOCK CHOCOLATE CHIP 8 1/2X11


Inks:
CLASSIC STAMPIN PAD BLUE BAYOU
CLASSIC STAMPIN PAD CHOCOLATE CHIP

Accessories:
BRADS VINTAGE
JUMBO EYELETS PEWTER
PUNCH 1 3/8 INCH CIRCLE
PUNCH 1 1/4 INCH CIRCLE
PUNCH 1 INCH CIRCLE
PUNCH LARGE STAR
PUNCH STAR
CROP-A-DILE
STAMPIN DIMENSIONALS
SNAIL ADHESIVE PERMANENT

Tuesday, June 17, 2008

Homemade Gift Bag


Here is a gift bag I made for my grandfather made with the Creative License simply scrappin' kit which was a hostess exclusive kit available in the last catalog. Just add some designer series paper and some self-adhesive die-cuts and you have a beautiful gift bag in seconds. All I added was the stamped greeting in Wild Wasabi from the retired stamp set All Year Cheer II and some Blue Bayou double stitched ribbon.

Wednesday, June 4, 2008

Happy Birthday to my Dad!


Here is the birthday card I made for my dad. It made with the Fall Flowers designer series paper and the Celebrate Everything stamp set. I started with a piece of Soft Sky card stock, next I laid down the designer series paper. Next I put the greeting down with on top of the Old Olive wide grosgrain ribbon. Then you will see there is a piece of Old Olive cardstock on top of the greeting as well as strip below the designer paper. Next, I added a strip of soft sky that I paper pierced. I also paper pierced the bottom of the soft sky. Next came the stars which I punched out with my large and small star punches, I also put a rhinestone brad through the center. Lastly, came two silver brads.

Friday, May 30, 2008

Carousel Notes Mirror

When I saw this idea, I just knew I had to case and recreate it. I don't remember where I saw this great project. How great is this home decor item made with two carousel notes from the Occasions Mini and a mirror I got in the craft store. First I attached the mirror to a carousel note with sticky strip which will be my base. Next I cut out the center of the second carousel note with our coluzzle cutting system. I then made cut out the circle frame with the coluzzle in Wild Wasabi card stock. I then attached the cut out carousel note and the frame to the front of the mirror with more sticky strip. Next, I stamped the flowers from the True Friend stamp set and cut them out. The greeting comes from the Smarty Pants stamp set. Next, I used my crop-a-dile to punch holes into the center of each of the scallops. Lastly, I attached some groovy guava double stiched ribbon.

Sunday, May 25, 2008

Live in the moment


I was totally inspired by this month's demonstrator exclusive magazine, Stampin' Success for this project. I just love the colors in this color combination, Whisper White, Wild Wasabi, Rose Red and Certainly Celery. The magazine showcases a scrapbook page, but I wanted to capture in a framed artwork. Two summers ago, one of my little friends, Gianna, spent the every minute trying to plan the next thing we were going to do on vacation. We just kept saying to her to live in the moment. Well those words came to bite me in the butt recently when I was talking to her mom and her response to me was the same words, Live in the moment. So here I stamped those words with my taffy alphabet and my On Board Simon Upper Chipboard with White White craft ink and embossed in white embossing powder. The butterflies from the Garden Whimsy stamp set were stamped in Rose Red and cut out. The finishing touches were the Certainly Celery wide grosgrain ribbon and Rose Red buttons.

Monday, May 19, 2008

Gift from my Friend Debbie


Here is an altered notebook I received from my friend Debbie. How beautiful is this notebook. she covered it with the Afternoon Tea Designer Series Paper from the Occasions mini catalog. She then added monogram pearl letters she found in the dollar bin in Michaels. She then stamped the word Friend from the Fundamental Phrases and punched it out with the Word Window punch. She then tied it onto the letter with our linen thread. She embellished the notebook with Pretties with a rhinestone brad, Wild Wasabi double stitched and white taffeta ribbon. Thank you Debbie for this beautiful work of art.

Sunday, May 11, 2008

3 Cards with One Design

Here is a card template I came up with that is super easy and a great way to use up Designer Series Paper scraps as well as because of all the punching your card stock scraps. It first starts with a piece of 8 1/2 x 11 cut down the middle verticall, so you should now have a 4 1/4 x 11 piece of card stock. You then score the piece at 2 inches and then fold the rest of the white card stock under. The first thing you do is make your scallop edge with your slit punch that you attach to the flap. Each of the scallops you paper pierce with your paper piercer. Then you take a matching piece of paper and cover the rest of the Whisper White card stock. To hide where the paper meets, you tie a piece of coordinating ribbon. Then you embellish and add a greeting.


The first card is made with Purely Pomegranate card stock and double stiched ribbon. The embellishment is made with circle and our scallop punches as well as squares cut out. The greeting comes from the Define Your Life stamp set.

The next card is made with our Soft Sky Prints Designer Series Paper and double stiched ribbon. The star comes from our Nursery Necessities stamp set that I punched out with our Star punch. The scallop was was paper piereced. The greeting comes from the Full of Life stamp set.


The last card is made with our Pumpkin Pie Prints Designer Series Paper and grosgrain ribbon. The flower was stamped from the Polka Dots & Paisleys stamp set. The greeting comes from Full of Life.

Saturday, May 10, 2008

Spring Fling


I just attended our regional Stampin' Up! event with our Inkredible group it was in Denville, NJ. What a great day of stamping fun, catching up with friends, making new ones and learning great new business ideas I can't wait to try. Here are the wonderful projects we got to make with our Jersey Shore Designer Series Paper, Chipboard and Take Note Rub-ons! There is a pocket message board, chopstick photo album, gift envelope and Dahlia Fold card. You are sure to see these great ideas in future workshops!


I not only attended, but also did a demonstration today as well. I showed how to do some of the scrapbooking techniques and tricks in my scrapbook pages. The day started off great and I was the first one to win a door prize and then I ended the day with winning a crop-a-dile. The next event is August and it will be a great one filled with all the details of our 20th anniversary Stampin' Up! celebration our annual convention. So if you want to be a join us, let me know and you can come as my guest when the day comes.

Thursday, May 8, 2008

12x12 Mystic Seaport Scrapbook Page

Here is scrapbook page that I worked on. I wanted to have to try to make it somewhat nautical even though I didn't have any stamp sets for the occasion. So I started with the small diamond print in the Soft Sky Prints Designer Series Paper. I covered the chipboard M from the On Board Simon Upper chipboard. Then the rest of the title was stamped with the taffy alphabet. Then I took my hodgepodge hardware and tied a piece of Bravo Burgundy grosgrain ribbon and attached it to the M. Next came the strips of white that I stamped with the image from the One of a Kind stamp set. I then stamped the same image in a circular fashion in the coluzzle cut out. The center I put my journaling inside. I also attached another piece of Hodgepode to the coluzzle images that I tied another piece of grosgrain ribbon. The last piece was the label holder with the date journaled inside.

Sunday, May 4, 2008

This Week's Color Combination Scrapbook Page


Here is this week's color combination: Pretty in Pink, Purely Pomegranate and Old Olive. With the shades of pink I knew this would be a great color combo for a scrapbook page for Julie. She is always wearing a shade of pink. First came the F from the On Board Chipboard Upper which I covered in textured Purely Pomegranate card stock. Then I stamped the rest of the word fun with my Big Deal alphabet. Next came the rest of the title in which I stamped with the Short Order Alphabet. Next came the embellishments. I stamped the images from the Polka Dots & Petals stamp set and then I punched them out with the 1 1/4", 1, 3/4" circles. The center of the flowers I put an old olive brad. Then with my 1/4" circle, I punched Purely Pomegranate and Whisper White circles and randomly added them to the page. Two of the photos I cut out circles with my Coluzzle cutting system and mounted them on circles.

There was so many things I wanted to remember from our trip to the fair that I wanted to add some journaling, but found there was no room on the page for it. So I made a pocket to put the journaling in. I folded a piece of card stock in half and stapled it. Then I adhered the photo on top to cover the staples underneath. I did all my journaling and added some embellishments on the side of the card. The top of the journal insert, I punched the Round Tab punched, folded and stapled it to the top.